Friday, September 22, 2017

Myrtle Beach Shawl - Bernat Beyond Yarn

Myrtle Beach Shawl - by Shandeh

I designed this shawl while on vacation at Myrtle Beach, SC. The pale pastels remind me of seashells, and the ripples bring to mind the waves on the shore.  I'm not finished knitting the whole shawl yet, so I'll remember to load a photo later, so you can see the entire shawl. It is worked from end to end.

I hope you like my design! I used a Yarnspirations baby blanket pattern as my inspiration.
Yarn: Bernat Beyond yarn in two colors
(I used Quartz Pink for Color A, and Cream for Color B)
More colors available from Yarnspirations:
http://www.yarnspirations.com/yarn/bernat-beyond.html

Knitting Needle: Size 11 (8 mm) 24" circular, or size needed to achieve gauge.
Gauge: 12 stitches = 4 inches in stockinette stitch

Shawl measures about 30" wide x 60" long
Note: If you want your shawl to measure 24" wide, cast on 83 stitches.

Abbreviations:
K = Knit,  K2tog = Knit next 2 stitches together, P = Purl, PSSO = Pass slipped stitch over, RS = Right side Sl1 = Slip next stitch knitwise, SSK = Slip next 2 stitches one at a time. Pass them back onto left-hand needle, then knit through the back loops together. St(s) = Stitch(es), WS = Wrong side, YO = Yarn Over

Start Here:
Using Color A, cast on 103 sts. Do not join.
Working back across needle, knit 1 row.

Begin Stitch Pattern:
1st row: With Color A (RS). K1. K2tog. *K8. (K1. yo. K1) in next st. K8. Sl1, K2tog, PSSO.
Repeat from * 3 times more. K8. (K1. YO. K1) in next st. K8. SSK. K1.
2nd row: Knit.
Switch to Color B, dropping Color A for using later.
3rd row: Same as Row 1
4th row: K3, Purl to last 3 stitches, K3

These 4 rows are the Stitch Pattern.
Never cut the yarn.  Just drop the unused color, and pick it up again every 2 rows.

Continue in pattern, always working Rows 1 & 2 with Color A, and Rows 3 & 4 with Color B
until work from beginning along side edge measures about 60 inches, ending on a RS row.
With appropriate color, cast off knitwise.

Saturday, July 22, 2017

Seed Blocks - 12 inch Afghan Square

Ten years ago, I designed this 12 inch square knitted design.  Since then, several people have used my design for afghans and dishcloths.

I'm proud of this design, and decided to share it here on my blog, to make it easier to copy.  Up until now, it's been on my Flickr page, which is not as easy to navigate.

Maybe one day, I'll go one step further, and make it into a fancy document. Who knows? It depends entirely upon my mood and energy level. (tee-hee)

Sandy's Seed Blocks - 12 inch Afghan Square

Materials: Worsted Weight yarn, Size 8 knitting needles

Cast on 48
Knit first 3 rows

Pattern Stitch (repeat between *s to end of row):

Row 1: K4, *P, K, P, K, P6*, end K4
Row 2: K4, *K5, P, K, P, K, P*, end K4
Row 3: repeat Row 1
Row 4: repeat Row 2
Row 5: repeat Row 1
Row 6: repeat Row 2
Row 7: repeat Row 1
Row 8: repeat Row 2
Row 9: K4, *P6, K, P, K, P*, end K4
Row 10: K4, *P, K, P, K, P, K5*, end K4
Row 11: repeat Row 9
Row 12: repeat Row 10
Row 13: repeat Row 9
Row 14: repeat Row 10
Row 15: repeat Row 9
Row 16: repeat Row 10
Repeat rows 1 – 16 until piece measures ~11.5 inches

Knit 3 rows
BO loosely

Saturday, June 10, 2017

Baby Hat Patterns for Charity (Hospital approved)

One of my favorite things to do is to knit and crochet baby hats for the hospital. It's a quick, easy project, and the hats are very appreciated.

Here are my favorite Yarnspirations patterns for making baby hats. The hospital has accepted all of these designs, as long as they are knit with man-made, washable yarn. (Acrylic, Nylon, Polyester, etc.)

By the way, if you have pets, please make sure that no pet hair gets into the project, to avoid causing allergic reactions with the babies in the hospital.

Knitted Baby Hats:
This little hat is perfect for beginning knitters, and includes instructions for preemie babies.  It is sized for 3-4 pounds, 5-6 pounds, 7-9 pounds, and 10-12 pounds. You can embellish the hat if you want, with flowers or bows or ears.  It's a quick project, and so adorable!


This little hat is also great for beginning knitters.  Experienced knitters can easily convert to knitting in the round. Sweet little hat, that includes sizing for 3-4 pounds, 5-6 pounds, 7-9 pounds, and 10-12 pounds. Precious!

This little rabbit ears hat is perfect for Easter and Springtime.  Includes sizing for Newborn, 3 months, and 6 months. It's in garter stitch, so converting to knitting in the round would not be recommended, unless you are a wiz at purling in the round. This would be a fun project for beginners. The little jacket is easy too!


Just your average, simple preemie baby hat, with a roll brim.  Easy to make, but I don't really like the folded bulky top. 


I love this pretty hat! It's a good design for someone who wants to learn something beyond basic knit stitches, and it's so lovely! Includes sizing for Preemie, 3 months, and 6 months.


Treat those babies like royalty! This cute design includes sizing for 1-3 pounds, 4-6 pounds, Newborn, and 12 months.  This hat is knit in the round, using double pointed needles.


Crocheted Baby Hats:

Easy peasy! Crocheted in the round, so you can try out different ways of connecting the stitches as you go. Great learning tool for beginning crocheters. The hat includes sizing for 3-4 pounds, 5-6 pounds, 7-9 pounds, and 10-12 pounds. The tiny hats are so adorable!  Add embellishments for fun, if you like

I really enjoyed learning to make this hat. It's worked in the round, and the clusters go very quickly. Sized for 3-4 pounds, 5-6 pounds, 7-9 pounds, and 10-12 pounds. Great for beginning crocheters!  Easy to add embellishments, like flowers or bows.


Sized for Newborn, 3 months, and 6-12 months.  This little hat has ears added for fun.  The little jacket is also simple to make. Great for beginning crocheters!


Very basic preemie hat - not my favorite, because I don't like the bulky folded top.  But it's easy to make, and works well.

I adore this lacy hat!  SO pretty! It includes sizing for Preemie, 6-12 months, and 18 months. If you use a very thin yarn and tiny hook, you could make it smaller for tiny preemies.

Monday, February 20, 2017

Baby Cardigans for Charity

I am collecting hand knitted and crocheted newborn baby cardigans as a mission outreach to UMCOR.
(United Methodist Committee on Relief) http://www.umcor.org

These cardigans must open from the front, and be NEW and UNWASHED.
Please do not include any religious, political or patriotic notes or emblem on the cardigan.

Here are some patterns that will work for the project:

Knitted
Vintage Cardigan (3 mths)
Hooded Cardigan (0-6 mths)
Pretty Cardigan (0-6 mths)
Check Stitch Cardigan (0-6 mths)
Sweet Matinee Cardigan (0-3 mths)
Simple Baby Jacket (3-6 mths)

Crocheted
Cluster Yoke Cardigan (3 mths)
Sweet Baby Hoodie (6 mths)
Boys Cardigan (6 mths)
Daisy Chain Cardigan (6 mths)
Lacy Cardigan (6 mths)

If you would like to send a cardigan for this need, please mail it to:

UMW Layette Kit Cardigan
c/o Memorial UMC
4012 Central Ave
Charlotte, NC 28205

If possible, protect the cardigan from damage by sealing it in a new gallon sized Ziploc bag before placing it in the mailing envelope. This bag will be used for an additional mission outreach project.

Thank you for your help!

Thursday, November 24, 2016

Diamond Brocade Chunky Blanket

My grandma asked me to knit her a pink blanket. After perusing my stash, I found a good bit of Bernat Softee Chunky in the color "Peony Pink". This should make her happy.
Diamond Brocade Chunky Blanket
designed by Sandy Davis (me)
Yarn: Bernat Softee Chunky 
(I will post total number of skeins after I finish making the model)

Using US size 13 knitting needles (9 mm), cast on 136 sts. 
(This makes the blanket about 65 inches wide)

Knit 8 rows (garter stitch)

Note: In the following pattern rows, always repeat the directions between the asterisks until you reach the last 4 stitches. (I use stitch markers to mark the border stitches.)
Row 1: (RS) K4, *P1, K7*, K4
Row 2: K4, *K1, P5, K1, P1*, K4
Row 3: K4, *K2, P1, K3, P1, K1*, K4
Row 4: K4, *P2, K1, P1, K1, P3*, K4
Row 5: K4, *K4, P1, K3*, K4
Row 6: K4, *P2, K1, P1, K1, P3*, K4
Row 7: K4, *K2, P1, K3, P1, K1*, K4
Row 8: K4, *K1, P5, K1, P1*, K4
Knit the 8 rows above until the blanket reaches desired length.
Knit 8 rows (garter stitch).
Bind off loosely.

I'm about halfway through my work, so expect an update soon!
- Shandeh

Saturday, October 22, 2016

Bird's Eye Baby Blanket

From Shandeh:
Recently, I crocheted a tiny blanket for the hospital, using two colors of Bernat Baby Coordinates yarn. I was asked for a knitted version of the design.

I came up with this:

Bird's Eye Baby Blanket

Designed by Sandy Davis (Shandeh)

Sized for preemie babies in hospital.
This blanket has no holes, so baby fingers will not catch in fabric.
Size: 19-20 inches square

Gauge: 21-22 sts = 4 inches

Materials:
Bernat Baby Coordinates yarn - 2 colors
Size 6 (4 mm) knitting needle

Note: Do not cut yarn when changing colors. Just carry the yarn up the side.

Cast on 100 stitches with Color A
Knit 5 rows
Drop Color A, and switch to Color B

Row 1: (Color B)
K4 * Slip 1 purl-wise, K1 * K4
(Repeat between*s to last 4 sts)

Row 2: (Color B)
K4, Purl to last 4 sts, K4
Drop Color B, and switch to Color A

Row 3: (Color A)
K4 * K1, Slip 1 purl-wise * K4
(Repeat between *s to last 4 sts)

Row 4: (Color A)
K4 * Purl to last 4 sts * K4
Drop Color A, and switch to Color B

Repeat these 4 rows until blanket is square, ending on Row 2. Switch to Color A.

Knit 5 rows garter stitch in Color A.
Bind off stitches. Weave in ends.

Here's a link to the crocheted blanket that inspired my knitted design:
http://www.yarnspirations.com/patterns/sweet-striped-mini-blanket.html

Monday, April 6, 2015

Bernat Fleurettes/Satin Shawl - Free Pattern

I just realized that I never shared a completed photo of the shawl I designed back in 2013.  Bad Shandeh!  Anyway...I used Bernat Fleurettes and Bernat Satin yarns to make it, and I was very pleased with how it turned out.  Pretty!

I wrote an article about it on the Yarnspirations website.  You can read that here: http://blog.yarnspirations.com/shandehs-pattern-bernat-fleurettes-shawl/

Finished Shawl - Folded

I think the crochet border really adds a nice touch.

Finished Shawl - Top Corner

Here's the pattern:

Bernat Fleurettes/Satin
Knitted Shawl, with Crocheted Edge

Designed by: Sandy Davis (Shandeh)
Materials:
3 skeins Bernat Fleurettes (I used the color Honeysuckle)
1 skein Bernat Satin (I used the color Stone)
Size 9 knitting needle (I used circular needles, 29 inches long)
Size G crochet hook
Yarn needle for weaving in ends
Note: The shawl is worked from the bottom point, up to the neckline.  It grows by ONE stitch on each row, creating a triangle.
Measurements: The finished shawl is 42 inches wide, and 28 inches along the sides.  It measures about 20 inches from the neckline down to the bottom point of the triangle.  If you would like your shawl to be larger than this, you will need more skeins of Fleurettes, and possibly one more skein of Satin.

Instructions

Using knitting needle and Fleurettes yarn, cast on 3 stitches
Pattern Row: Knit 1, Yarn Over, Knit the rest of the row
Repeat this row until you run out of the first skein of Fleurettes at the end of a row.  Cut the yarn, leaving a 5 inch tail.
Change to Satin yarn.  Work 6 rows of Pattern Row, making 3 ridges of garter stitch.  Cut the Satin yarn, leaving a 5 inch tail.
Using another skein of Fleurettes, continue working the Pattern Row until you run out of this skein of Fleurettes, ending on a wrong side row.  You should be ready to begin a right side row after this.  Cut yarn, leaving a 5 inch tail.
Note: You will be able to tell the right side from the wrong side by looking at the section where you worked the Satin rows earlier.  The right side will look smooth at the color changes.  The wrong side will have a “dotted” appearance at the color changes.
Change to Satin yarn.  Work 6 rows of pattern, making 3 ridges of garter stitch.  Cut the Satin yarn, leaving a 5 inch tail.
Using your last skein of Fleurettes, continue working the pattern row until you run out of this skein of Fleurettes, ending on a wrong side row.  You should be ready to begin a right side row after this.  Cut the Fleurettes yarn, leaving a 5 inch tail.
Change to Satin yarn.  Work 6 rows of pattern, making 3 ridges of garter stitch.  Cut the Satin yarn, leaving a 5 inch tail.
If you want to make a larger shawl than the original pattern describes in the measurements above, you can knit additional sections at this point in the pattern, switching between Fleurettes and Satin, working your final section with Satin yarn.
When your shawl is as long as you want, bind off the stitches loosely.  Weave in all the loose ends on the wrong side of your shawl.
(Note: If you don’t know how to crochet, you can now make a knitted edging with Bernat Satin yarn, and sew it onto the sides of your shawl.)
Crochet Edging
Using Satin yarn, and a size G crochet hook, work a single crochet edging along the sides of the shawl, starting at the top left corner on the RIGHT SIDE of the fabric, working down to the bottom point.  Be very careful when you work across sections where the Fleurettes blossoms are on the edge.   Arrange the blossoms so they look proper on each side of the fabric.
When you reach the bottom point of the shawl, work the following into one stitch:
1 sc. Chain 1. 1 sc.
Continue working a single crochet edging up along the other side of the shawl, until you reach the top right corner.
TURN, working 2 chains.  Work a hdc border along the sides on the WRONG SIDE of the fabric, until you reach the chain stitch at the bottom corner.  Work the following into that chain:
1 hdc, ch 2, 1 hdc
Continue making your hdc border along the other side of the shawl.
TURN, working 1 chain.  You are now ready to work on the RIGHT SIDE of the fabric again.
(Shell Border) *Skip the next sc, work 5 dcs in the following sc.  Skip next sc, work a sc into the following sc.*
Repeat between the *s until you reach the 2 chains at the bottom point of the shawl.  Work 2 scs in the chain space.  Continue the Shell Border up the other side of the shawl, repeating between the *s, until you reach the top edge of the shawl.  DO NOT TURN.
Work 1 chain.  Now, make a single crochet border along the top edge of the shawl, until you reach the other edge.  Cut yarn, and secure end.  Weave in ends on wrong side of shawl.
Enjoy wearing your new, fluffy, fun, lovely shawl! :)

Saturday, December 27, 2014

Finished Projects in December

I was able to finish a few things this month, in the midst of the usual seasonal craziness in my life.

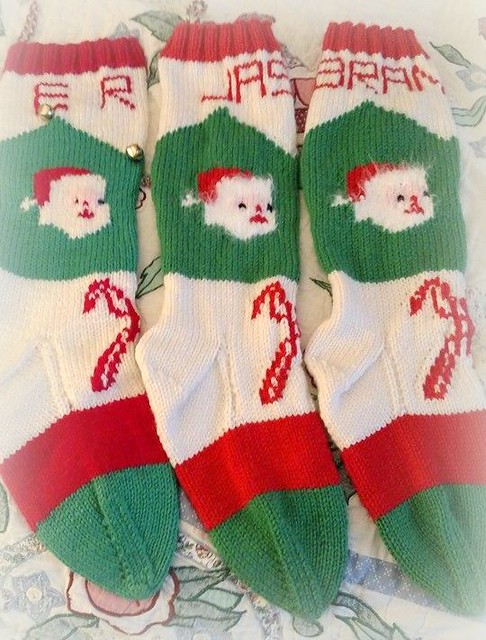
Copied a vintage Christmas stocking for a customer, using the free vintage pattern I found online. After measuring the original stitch gauge, I determined that Hobby Lobby "I Love This Yarn" would work to the correct gauge, and had matching colors.  They turned out just right, and the customer was pleased. :)  The original stocking is on the left - it says "E R",

Completed Christmas Stockings

Lately, I've been spending a lot of time at a local sports bar, talking, drinking, eating, and knitting while I'm there.  I've made a lot of fun friends this way, and they all take an interest in my knitting and crochet.  One of the bartenders there asked me to knit her a scarf, using black, grey, and white yarns.  I had a skein of Red Heart Boutique Changes in my stash, with shades of grey - so that's what I used.  I cast on 230 stitches with a size US 11 knitting needle, and knit every row.  When I ran out of yarn, I cast off.  It turned out pretty good!

IMG_20141221_202403.jpg

IMG_20141221_221215503

One of the projects I've been making while sitting at the bar is a Crochet Prayer Shawl, using a free pattern on the Yarnspirations website.  I used 5 skeins of Bernat Satin yarn in the color "Sunset", which is bright orange.  Lots of sports fans wanted to claim my shawl, because their favorite team happened to have that shade of orange as their team color.  But, I told them that this shawl was for a friend.  (I think I might actually claim it for myself!)

Prayer Shawl - Getting Started

Crochet Prayer Shawl

What did you knit for the month of December?

Friday, September 19, 2014

Yarnspirations News: 2014 Caron Mystery Adventure Scarf!

Most of you already know that I work for Yarnspirations.  You might not know what I actually do there, though.  Well, it's like this.  It changes from day to day.  Sometimes, I moderate the forum on their website.  Other times, I'm surfing through their Facebook posts, offering my help there as well. Occasionally, I write an article on the Yarnspirations Blog.  Once in a while, you'll find me on Ravelry, talking to Yarnspirations customers there as well.  I run the Ravelry Yarnspirations group, and the Bernat Crafters group, among other things.

I don't really know what my "title" is.  Who knows.  Doesn't matter to me. I'm just happy to work for them.  I have a TON of yarn in my craft room, and I never run out of projects to make.  Lots of pattern books, and thousands of free patterns as well.  When I die, you'll find yarn, yarn, yarn, and even more yarn....because there is no way I will EVER use all of this.

Right now, we are in the middle of a Mystery KAL/CAL, and I'm having a lot of fun with it.  Every week, we get a new clue, which includes 3 options for a knitted or a crocheted scarf.  Everyone's scarf will be completely different.  Neat!

I'm doing both crafts - knit and crochet.

For my knitted scarf, I'm using Caron United yarn in the colors Navy, Burgundy, and Aran.

My Yarn

For my crocheted scarf, I'm using the happy shades of Orange, Red, and Mustard.

Caron United Colors

Here's how they look so far:


For the knitted section, I used Option A (beginner) from Clue #1
The crocheted scarf was made using Option C (intermediate) from Clue #1

I got Clue #2 this week, so I need to get going on those.  I don't want to fall behind in this project.  It's quick and fun, so I have no excuse.  Wish me luck!

If you want to join us in the KAL/CAL, sign up over there --> Mystery Scarf

Thursday, February 20, 2014

Celebrating 7 years of Oddball Blankets for Charity!

Exactly seven years ago tomorrow (Friday, February 21st - 11 am EST) is our 7th Anniversary for making Oddball Blankets for charity!  Read where it all started right HERE.

To celebrate the event, I will be having a GIVE-AWAY tomorrow!

Just go to Shandeh's Facebook Page, and "like" the post about the 7th Anniversary.  
(deadline for entering - Feb 22 @ midnight - end of the day)

Your name will be entered in a drawing for free knit/crochet pattern books.  :)

I am amazed that our blankets are still being made all over North America.  My little idea grew into a huge thing, and the world is better for it. :)

Now, there are several Oddball Knitter groups, making blankets for charity:

East Coast Oddball Knitters

Western Regions Oddball Knitters

Western Canada Oddball Blanket Society

Thank you all for your hard work, making blankets for charity!

Oddball Charity Blanket KAL KH Button
Oddball Blanket #2 Complete


KAL button - Oddball Baby Blanket
Peppy Pastels Baby Blanket Complete!

Wednesday, February 12, 2014

Getting Stuff DONE!

I've been missing the Yarnspirations website, while they are going through major maintenance.  But, thankfully, I have LOTS of their patterns already downloaded to my computer.
(By the way, if you need one of their patterns right now, you can request it from Customer Support through email, because their email is working just fine: inquire@yarnspirations.com)

So, I've been working on some unfinished projects, and starting work on some others I've been wanting to make.  As luck would have it, it's been snowing in my area, so this has given me MORE opportunity for working on my existing projects.

Take a look:

Valentine Dishcloth - DONE

Valentine Dishcloth

Mod Flower Dishcloth, from Bernat's "Bright Ideas" pattern book - DONE

Crochet Dishcloth for B&B Owner

Yoga Socks, using Patons Kroy Socks yarn - DONE

Yoga Sock Complete

And I've been crocheting some more of the "Wagon Wheels" I started last year.  I was able to make 11 wheels with one skein of Vickie Howell "Sheepish" yarn.  I have two skeins left, so I think that will be enough to make a nice scarf or wrap.

Sheepish Wagon Wheels

I've also cast on the "Ripple Baby Blanket", using Bernat Baby Blanket yarn, in the colors "Pitter Patter" and "Baby Yellow".  Photos for that soon.

Bernat Baby Blanket - Pitter Patter

Thursday, February 6, 2014

My Video Reviews: Patons, Bernat, Caron

Over the past year or so, I've been making videos of Patons, Bernat, and Caron yarns when I use them for the first time.  I've made playlists on YouTube for each brand.  Check 'em out!

Bernat Yarns - My Reviews

Patons Yarns - My Reviews

Other Yarns - My Reviews

Be sure to check back occasionally, because I'll be adding new videos as time goes by, and they will be added to the playlists.

Happy Knitting and Crocheting, my friends!  :)

Saturday, January 18, 2014

Valentines Day Crochet-Along - A Sweet Dishcloth!

Time to celebrate love and happiness!  Get your crochet hook (size H), and four colors of  cotton yarn (white, pink, red, and light blue).  Won't this dishcloth be pretty in your kitchen? Go to the Yarnspirations Forum to join me in making this pattern.  The Crochet-Along starts Sat, Jan 25th.


Sunday, December 22, 2013

Quick Super Bulky Infinity Scarf

The latest scarf trend is infinity scarves/cowls, and they are EVERYWHERE! My mother asked me to make one for her, but none of the patterns I found went well with the yarns I had.  Most designs I found would take a very long time to make, and I wanted one right now!

Since I needed something quick, I decided to use some lightweight super bulky yarn in my stash.
Bernat Knit or Knot Clara.  I have several skeins, in sets of two skeins each.  I knew that it would take two skeins to make the scarf long enough.  After my first failed attempt (too long, and too thin), I finally got it figured out.

I gave my first completed scarf to my sweet friend Maddie.  She loves it!  (and it looks great on her)


Here's how I made it:

Super Bulky Infinity Scarf

Materials: 2 hanks of Bernat Knit or Knot "Clara"
Size 19 (16 mm) circular needle - 29 inches long
Large Eyed Yarn Needle for weaving in those huge ends!

If you can't find Bernat Knit or Knot "Clara" yarn (it's been discontinued), look for a soft, lightweight super bulky yarn that knits to a gauge of 2 stitches per inch with a size 17 (13 mm) knitting needle.

Pattern:  Loosely cast on 100 stitches with size 19 knitting needle.  Join in the round.

Round 1 - Knit
Round 2 - Purl
Rounds 3 & 4 - Knit
Round 5 - Purl
Rounds 6 & 7 - Knit
Round 8 - Purl
Round 9, 10, & 11 - Knit
Round 12 - Purl
Rounds 13 & 14 - Knit
Round 15 - Purl
Rounds 16 & 17 - Knit
Round 18 - Purl
Cast Off, then weave in ends.

Enjoy!

Here's a photo of Bernat Knit or Knot Clara, so you know what the original yarn looks like:


That yarn comes in a long hank, so you'll need to get a friend to hold it for you, as you wind it up into a big ball.  Or, you can use a fancy yarn swift. :)   Here's a video, showing how to wind up that yarn:
http://www.youtube.com/watch?v=XKkoYtMu7Jg

Here's another one I made, using a different color of the same yarn:
Knit Knot Clara Infinity 3
Edited: I miscounted the center rows when I originally posted the pattern.  There should be 3 knit rows in the center, instead of 5.  So, there are 18 total rows for the design.  Happy Knitting!

Tuesday, August 20, 2013

A Whole Lotta Knittin' Goin' On!

I have SO MANY PROJECTS GOING RIGHT NOW!  ACK!
But, I'm actually enjoying the process.  When I get tired of working on one, I just set it aside, and pick up another.

A few days ago, I cast on a triangle scarf, trying out Bernat's new "Fleurettes" yarn, in the color Honeysuckle.  I only have 3 skeins of it, so I'm going to knit some rows in between each skein using Bernat Satin in the color Stone.  I might add a crochet border around the edge, using Satin for that as well.  Looking forward to seeing how it turns out!

Bernat Fleurettes & Satin Shawl

Here's another:  A Christmas stocking for a new customer.  I'm using Red Heart Sport for this one.  I'm also making another one in wool (Knit Picks Palette), for my sweet repeat customer. :)

Stephen after Santas

After two unsuccessful attempts at knitting (or crocheting) a tie for my friend John, I think I've finally found the perfect pattern for the yarn.  The yarn (Cascade Yarns Heritage Silk Paints) looks lovely with standard stockinette stitch, and the bias design makes it pop!  There will be some lining and seaming involved at the end, but that's no problem.  I grew up sewing, so it should be a cinch.  (famous last words...I know....)

Tie for John

Another project I'm enjoying working on is my "Recurrent Dream by Moonlight Shawl".  Made that name up myself - I'm using Moonlight Mohair in the color "Northern Lights", and Moda Dea Dream in Black.  They work so well together, and the French Scarf pattern is PERFECT for it. :)

Recurrent Dream by Moonlight

There are some other projects going as well, but I figure this is enough to tell you about.  Stay tuned!

Monday, August 5, 2013

Bernat Bamboo Crochet Vest

For the past few months, I've been crocheting the Bernat Bamboo Crochet Vest.
Last night, I actually had time to seam it together! :)

Completed Vest

My vest is size 3X, and is a nice, comfortable fit.  The Bernat Bamboo yarn is eco-friendly, moisture-wicking, and cool - perfect for the hot, hot weather here in Charlotte, North Carolina.

Thursday, July 4, 2013

My Craft Room is ReDone! (again....for now....)

After a month of organizing my home, I was finally able to concentrate on my craft room.  It was a disaster, because lots of my craft stuff had migrated all over the house.  And I REALLY wanted to get it organized, because I had invited a group of crafty friends over, and they were all excited about seeing my craft room.  Now, THAT is an incentive to get a craft room organized!! :)

I'm very glad to get it all done.

Craft Room


Desk at Window

Craft Room 2

Of course, it's never really COMPLETELY done.  I still want to go through all those boxes of yarn, and get them thinned out and organized a bit better.  But, it works for now.

I went around with my video camera for a walk through.  Check it out!
(Be sure to have a cup of coffee on hand.  It's a LONG video.)
http://www.youtube.com/watch?v=jh1oeJeO6LQ

Tuesday, July 2, 2013

Re-Doing My House, so I can Remodel my Craft Room!

Last month, I decided to remodel my craft room.  It really needed to be done, because my craft stuff was starting to migrate all over the house again.  The main issue was that my BED was in the craft room!  Ugh!  It had to be moved in there a couple years ago, because there was a hole in my bedroom ceiling.  I got the leaky roof repaired, but still needed to fix that ceiling hole.  I decided to stuff it with polyester fiberfill, so it wasn't standing open.  But, I just couldn't sleep in that room....the hole freaked me out!

In order to move my bed back out of the craft room, I was thinking that I would need to get the hole fixed first, then redo the painting in there, and do the flooring as well.  (I removed the carpet some time ago.)  This would take quite a while to get all this done, because I didn't have the skills to fix that ceiling hole myself, and I didn't have the money to pay for a carpenter either.  So, I figured I would have to keep it all on hold.

I have a smaller bedroom in the house, but I've been using it as an office for the past few years.  My mother told me that I should move my bed into that room.  At first, I discounted the idea, but then gave it some thought.  It made sense to move my bed in there, and move the office to the room with the ceiling hole.  So, that's what I've done.  Here's my little bedroom now:

Ready to Sleep

All my embroidery supplies are in this room also, because I keep them in underbed boxes.

Embroidery Stuff Under Bed

So, now that the bedroom was done, I had some SPACE available in my craft room!  Woo Hoo!

Bed Moved Out

So, I looked all over the house for all the craft supplies that had wandered.  I sure did have a lot of crafty stuff to organize!!!

Pile O Yarn

Next, I decided to do some work on the rest of my house as well.  I had invited some of my crafty friends to my house at the end of the month, and needed to get everything spic and span for their visit.  On to the BATHROOM!  What a nightmare in there.  I hadn't given it a good deep cleaning in ages.  So, everything came OUT of the bathroom, and waited in the hallway, while I did all that scrubbing and disinfecting.

Stuff from Shelves

Here's my bathroom BEFORE

Almost Empty

and AFTER

Bathroom Looking Better Tub Cleaned and Set Up

Makes me feel clean just walking in there now. :)

When my bathroom was done, I decided to straighten up my dining table and entryway as well.  Looks a lot better now.  I'm gonna paint that old 1970's panelling one of these days.  :P

Dining Table and Bookcase

When that was done, I did a deep clean in the kitchen area as well.  No photos of that, but it's greatly improved as well.  Now, that all my housework was done, I was FINALLY able to concentrate on the craft room.  Stay tuned for my next post, which shows my updated craft room! :)

Blog Archive

About Me

My photo
I'm a forum moderator and blogger for Spinrite Yarns (www.yarnspirations.com), and I spend WAY too much time there. :D You can also find me on the Knitting Help Forum occasionally