Friday, May 18, 2012

Bernat Forum: Knit and Crochet with Friends

Have you checked out the brand new Bernat Forum? 
You can find me there every day, moderating the forum, and participating in all the discussions.

It was originally created for the 2012 Mystery Blanket Crochet & Knit-Along.
Now, the Mystery Blanket-Along is over, but the Forum is still alive! :)
We are talking about so many things, including:

Bernat Yarns and Patterns - Here, we share our experiences with current Bernat products.


Helping Hands - Sometimes one of our forum members needs help with a knit or crochet project.  We all do our best to provide answers for each other.

Bernat Projects - In this part of the forum, we talk about all the Bernat projects we have knitted or crocheted.  Sometimes, we use a Bernat pattern with a different yarn.  Or a Bernat yarn with a different pattern.  We enjoy showing photos of all of them.

General Knit & Crochet - This part of the forum is for anything knit or crochet related.  So far, we've discussed knitting tools and gadgets, how to work with center-pull skeins of yarn, charity knitting and crochet, and tips and tricks for our yarn crafting.  We've also recently started a Learn to Knit, as well as a Learn to Crochet discussion.  To learn, we are making small projects together, offering advice and sharing photos of our work.  I sometimes make simple instruction videos as well.  It's fun to learn this way!

Crochet Alongs and Knit-Alongs - During our 2012 Mystery Blanket Crochet & Knit Along, we made lots of friends.  Several of us don't want to lose our friendships, so we are making more projects together until it's time for another big blanket.  Here are some of our current CALs and KALs:

On the Lace Cardigan CAL - 

Slouchy Lace Beret KAL -


Mermaid Tears Purse CAL -


We have also been making dishcloths, doily pillows, and tea cozies!

If that isn't enough topics for you, we also have an Off Topic area, where we are chatting up all sorts of things in our lives. Pets, Cooking, Travel, Reading, and Music are some of the things we've been talking about.

Come join us, so we can get to know you in the Bernat Forum!

Sunday, April 1, 2012

Knitting an Easter Bunny Toy

Since Easter is almost here, I wanted to knit a little bunny.
I looked for patterns on the Bernat Yarn website, and found this cute finger puppet pattern.
Bear, Bunny, Kitty, and Mouse Finger Puppet

Using Bernat Satin yarn in the "Banana" color, I quickly made this sweet little bunny!

Bunny Finished

As you can see, I decided to stuff the body and seam it closed.  I thought it worked better as a small toy than as a finger puppet.  I added the ribbon at the neck, just to finish it off.  So cute! :)

Here's how it looked as it was being made:

Body complete, and making the bunny head. Body Done - Starting Bunny Head

Body, head, and ears complete. All Parts Complete

Ears attached to head.
 Ears Attached

It only took a couple days to make, and was fun.  Small projects like this are always satisfying.

Friday, March 9, 2012

Knitting and Crocheting some Dishcloths

This month, I've decided to make a few dishcloths.  My mother is always asking me to make more, because she likes them a lot.  She usually wants them to be green, so I looked through my cotton stash, and found these two huge skeins of Bernat Handicrafter. 

Handicrafter - Psychedelic and Mod Green

The one on the left is the "Peace and Love" line, in the color "Psychedelic".
On the right is the color "Mod Green".

I've already started making one Mitered Dishcloth with the Mod Green, and it's going quickly.

Mitered Dishcloth

I think I'll use that same pattern for the Psychedelic, because the color changes should look cool with that design.  My mom is more into modern things than I am, so she should like these.

While working on that cloth, I also started a crocheted cloth for my kitchen.  I was interested to see how the Chrysanthemum Dishcloth would work up, since I'd never tried that.  And I'm still learning a few things about crochet, so this would teach me something new.

I used Bernat Handicrafter in two colors: Tangerine and Creamsicle.  It was quick and fun!

Chrysanthemum in Orange

I really like how large that cloth turned out - 10 inches across!
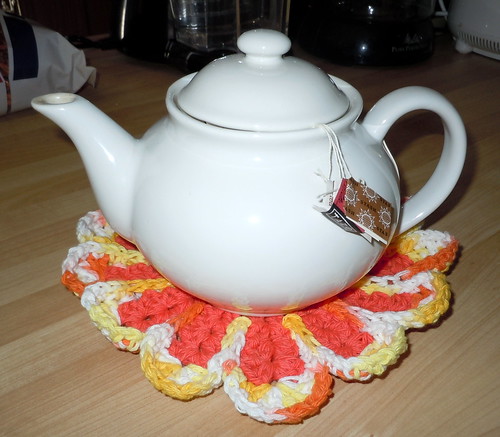
I'm using it as a doily under my teapot now. It sure does brighten up my kitchen. 
I just LOVE orange and yellow together - They bring sunshine to the world. :)

Chrysanthemum Doily

Saturday, January 7, 2012

2012 Mystery Blankets on Bernat Website

Yippee!  It's time for more mystery blankets on the Bernat website!

Back in 2009, we had a knit-along, where we made pretty blankets, using Bernat Satin.
In 2010, we had a crochet-along, making lovely blankets, using Bernat Softee Chunky.
In 2011, we did knit AND crochet baby blankets for the Project Linus charity.

THIS year (2012), Bernat is giving us clues to do knit and/or crochet blankets, using their new "Waverly" yarn.

And they aren't alone in sponsoring the event.  They've brought in interior design specialists from Waverly Fabrics, to help us in choosing just the right color combination for our blankets! :)  I think that is just awesome.  I especially like the "My Palette" webpage they created, that shows all the colors of Waverly yarn together, cleanly presented on a white background.

Along with the KAL/CAL, they have created a brand new discussion forum on their website, and they have asked ME to be the moderator. I am very excited about it, and have really enjoyed getting to know several knitters and crocheters all over the world for the event. 

Right now in the forum, there are over 1,000 interesting crafters, talking about what colors they are choosing for their blanket.  Some of the members are wanting to do the crochet blanket only, and others are choosing the knitted blanket.  A portion of us (myself included) are opting to make BOTH blankets.  Wish us luck!

Even though we have all that help from the Waverly Fabrics interior design experts, it is STILL difficult for us to make our final color choices for our blankets.  BUT, since the yarns have been arranged in color "moods" for us, we can't go wrong if we choose colors in the same group. 

Some of us (myself included) are color mood "rebels", and are just picking colors randomly.  I guess we think we are smarter than the experts.  HA!!

ANYWAY, I'm very excited to see how all our blankets turn out.  It's a fun event, involving knitters and crocheters from all over the world. 

Thursday, December 29, 2011

2012 New Year's Eve KAL - Knitting Help Forum

This year, I will be hosting our 5th Annual New Year's Eve Party on the Knitting Help Forum.

Every year, we knit a little project together, so we can keep it forever, to remember our party. :)

For our 2012 KAL, I've designed a little folding pocket to hold our knitting tools.  It has TWO pockets, folded together, with plenty of room for a small pair of scissors, a tape measure, some stitch markers, point protectors, a yarn needle, etc.  When folded, it is about the size of a deck of cards.

As usual, I am trying to keep the project simple, so knitters of all levels can participate.  Feel free to jazz up the design with your own ideas.

KH 2012 Knitting Tool Pocket - Complete


Front:
KH 2012 Knitting Tool Pocket

Back:
KH 2012 Knitting Tool Pocket - Back

Inside:
Finished - Ready to Use


It is knitted all in one piece, then folded, and seamed on the sides with whipstitch.

Here is how it will look when you finish all the knitting:
Knitting Complete

And here is how you get started:

2012 New Year KAL Project - KH Forum
Folded Pocket for Knitting Tools

Materials:
4 small skeins of worsted weight yarn in contrasting colors (2 dark, 2 light)
The model was made with KH logo colors - Purple, Red, White, Yellow
Size 7 or 8 knitting needles
Yarn needle for duplicate stitch embroidery
2 locking stitch markers

Gauge is not necessary for this project.

Skills learned:
Garter Stitch, Stockinette Stitch, Changing Colors, Simple Seaming (whipstitch), and Duplicate Stitch Embroidery

Color Key:
A - Yellow
B - Red
C - Purple
D - White

Instructions:
Using Color A, Cast on 14 stitches.
Knit 3 rows (Garter Stitch)
Row 4: Purl
Row 5: Knit
(Rows 4 and 5 repeated make Stockinette Stitch)
Continue in Stockinette Stitch (repeating Rows 4 & 5), until you have a square in Color A.
As you knit in Stockinette Stitch, you will be knitting all stitches on the "right side" of the fabric, and purling all stitches on the "wrong side" of the fabric.

Right Side (Knit):

Stockinette - Right Side (Knit)

Wrong Side (Purl):

Stockinette - Wrong Side (Purl)

If you need an easy way to check if your work is square, just fold the bottom edge up at an angle, and make a triangle.  If the bottom edge is too long, you need to knit more rows.

Not Square Yet:

Folding work to check for square

It's Square!

Checking work for square - finished

When the piece is a good square shape, make sure you worked the last row on the "wrong side" (all purl stitches).

Now, you are ready for your first color change.

First, cut the yarn you were using, leaving a 6 inch tail of yarn on the project.  Now, get Color B, and tie it loosely to the tail from Color A.  (you can untie the knot when you finish the project)

Tying on new color after a Purl row

Now, start knitting with Color B.  (Your first row will be all KNIT stitches, because you ended Color A with all PURL stitches.)

Here is how your first row will look after knitting with Color B:
First row of new color (Knit)

Now, knit 3 more rows in Garter Stitch. This will create 2 ridges in your fabric.
Next, starting with a Purl row, knit in Stockinette Stitch until this next section is a couple rows longer than the first square. 

Just fold your work along the garter stitch rows to compare the two sections:
Comparing length of first two sections

It should look like this when you finish the Color B section:

Folded
Red section is finished.

Unfolded
2 sections complete

You should end that section with a PURL row, then cut the yarn leaving a 6 inch tail.

Now, you are ready to tie on Color C.

With Color C, Knit 6 rows Garter Stitch.  This will create 3 ridges in your fabric.
Middle Fold Complete

Now, beginning with a Purl row, work in Stockinette Stitch until this section is the same length as the Color B section.

End this section with 4 rows of Garter Stitch, creating 2 ridges in the fabric.  You should end your last row of knit stitches on the WRONG SIDE of the work.

Now, cut Color C, and tie on Color D.
Beginning with a Knit row on the RIGHT SIDE, knit in Stockinette Stitch until the last section is square - matching the first section that was knit in Color A.  End with 4 rows of Garter Stitch, creating two ridges on your fabric. 

You can check to make sure all the sections were knit correctly, by folding your project in half like this:
Folded in Half

Bind Off loosely.

Now, your knitting is complete, and should look like this:
Knitting Complete


At this point, you can fold the project, to make sure it will work correctly. 

Pockets Folded In:
Sides Folded In

Folded Completely:
Folded Completely

As you can see, the pockets will be folded to the inside, and seamed on the sides.  But, before seaming, you will want to do your duplicate stitch embroidery.

First, you need to decide where you want your embroidery to be placed.  You might want to finish up the project without ANY embroidery.  You might decide to embroider the design on the inside pockets of the item.  I decided that I want the embroidery on the outside of my project. 

Now, you need to place two stitch markers, marking where you want the TOP of your embroidery to be placed:
Markers Placed

Now, embroider the designs on your project. 
I'm not going to do an explanation of duplicate stitch embroidery, because Bella Knitting has already done a great job of that HERE.

So, here are my wonky charts.  I know....I should have asked my computer guru son to make them, but he's too busy being a programmer. :P

If you want to embroider different letters or numbers, you can use my free charts here:
Letters: http://www.flickr.com/photos/59646927@N00/6604369855/
Numbers: http://www.flickr.com/photos/59646927@N00/6604342367/

The "KH" chart:
KH Chart

The "2012" chart:
2012 Chart

Here is how my embroidery looks on the red section:
KH Embroidery Done

And this shows my Purple Section in progress:
Embroidery Stitch Up Close

And here is my completed embroidery!  My "2012" section is a little off center, but I can live with it.
Embroidery Complete

After completing your embroidery, you can weave in all the loose ends of your project. 

Now, you are ready to seam together the sides of the pockets.  I just did a simple whipstitch seam, which gives my project a "rustic" look, which I like.  Some of you may prefer to seam yours a different way.

To do a whipstitch seam, just run your needle through both thicknesses of yarn, and gently pull your needle and yarn through the stitch.  Keep your stitches close to the edge, looking closely at your fabric, to keep the stitches even.  Just look at the edge of the fabric, and you'll start to see identifying marks in the yarn to help you place your stitches.
Seaming Sides with Whipstitch

Here is how one side of a pocket looked, after I whipstitch seamed it:
One Side Seamed

When you finish seaming both sides of each pocket, your project will look like this:
Seaming Complete

Now, you can weave in those ends, and you'll be finished!

Here is how the inside of your project will look:
Seaming Complete Inside View

Now, it's ready to use!  I hope you like your little folding pocket.  Just place some knitting tools inside the two pockets, and you'll have them ready to take with you.

Enjoy!

Friday, December 23, 2011

Footississimo - Very Very Thick House Slippers

Okay, say you find the thickest yarn you've ever seen in your life.  For example - Red Heart Boutique Doodle.

Red Heart Boutique Doodle

Now, take it home, and try to knit or crochet with it, using the absolute biggest needles and hooks you can find.  It's a LOT of work to make stitches out of this yarn - but it is possible, if you are patient.  The yarn is actually made for non-needle crafters, who can just knot or braid the yarn by hand to make scarves.

I decided to give this yarn a try this week, buying 3 skeins at AC Moore (on clearance 50% off).  The yarn is very soft, and surprisingly lightweight.  After experimenting with a size S crochet hook (Lion Speed Hook), then with size 35 knitting needles, I decided I preferred the look of the knitted fabric.  The crochet fabric was just too thick.

So, after playing with the yarn for a while, I held it in my hands, and imagined what I could make with it.  Too bulky for a hat, and I didn't want to make a scarf.  I considered making a baby blanket with it, but didn't think I had enough yarn for that.  There are only 12 yards in each skein.

After some consideration, I realized it reminded me of house slippers!  I figured that I could make a thick, fluffy slipper pretty quick with this yarn.  So, I went to work.  After just 30 minutes, my first slipper was finished!

I then wrote out the pattern, and made the second slipper.  Just as quick as the first.  

These slippers are SO comfy, and toasty warm! They are very thick, so I named them "Footississimo".  My geeky musician way of calling them Very Very Big Feet!  :)
Footississimo Complete

Quick and simple - YES, but don't get me wrong.....the yarn is NOT easy to work with.  It's a real workout, pushing the huge size 35 needle into each stitch, then wrapping the yarn (WHAP!) around for each stitch.  When pulling the yarn through the hole, you have to really work to make it happen.  So, I guess you could call it a "knitting workout".

I also used my size S crochet hook, to make an edging around the opening for the foot.  When I finished the slipper, I wove in the loose ends with my fingers.  There was no WAY I would find a yarn needle big enough to sew in the ends. Ha!

Here's the pattern:

FOOTISSISSIMO
Very Very Thick House Slippers

Size - Women's Shoe Size 8 or 9
(knit more or less rows before Row 7, to make it longer or shorter)

Materials
2 skeins Red Heart Boutique Doodle
Size 35 knitting needles
Size S crochet hook

Directions (Make 2)
Using knitting needles, cast on 7 stitches.  Be sure you pull each stitch snug against the knitting needle (not too tight, though!).  Leave at least an 8 inch tail of yarn, because you will use that end for seaming up the back of the slipper.

Row 1: Knit
Row 2: Purl
Row 3: Knit
Row 4: Purl
Row 5: Knit
Row 6: Purl
Row 7: Slip first stitch knit-wise, knit next stitch, then pass the slipped stitch over the knitted stitch (SKPSSO), Knit the next 3 stitches, Slip the next 2 stitches knit-wise, then stick the left needle through both stitches left to right, and knit the two stitches together through the back loop (SSK).
Row 8: Purl
Row 9: Knit
Row 10: Purl
Row 11: Knit 1 stitch, SKPSSO, Knit 2 stitches
Row 12: Purl
Leaving a long end (about 2 feet), cut the yarn, and run it through the 4 stitches on the needle.

Now, your knitting should look like this:

Footississimo Ready to Seam

Seaming
Before seaming, decide which side you want on the outside of the slipper.  (Stockinette or Reverse Stockinette).  I made mine with the stockinette side showing.  To make the slipper, just fold the knitted piece lengthwise, and seam down the back of the heel, using your fingers to pull the yarn through openings on both sides - doing a whipstitch seam on the outside of the project.  Next, seam up the top of the foot, starting at the toe, leaving an opening big enough for your foot to slip in.

Crochet the Cuff
Next, tie the rest of your yarn onto the end that was left after seaming the top of the slipper.  Then, use your crochet hook to do a single crochet border around the opening for the foot.  This will make the slipper fit comfortably around your ankle, and keep your foot nice and warm. 

Finishing
Weave in any loose ends, using your fingers to pull the yarn through openings in the project.

Wasn't that easy?

Now, put on your slippers, and have fun sliding across the floors in your house! :)

Footississimo Posed

Thursday, December 15, 2011

Living the French Scarf Fantasy

I am so in love with the French Scarf knitting pattern. 
So far, I have knit 3 of them, and I have plans (and yarn) to make many more.

It only takes about a week to knit one, and the finished product is GORGEOUS!
French Scarf Complete

That scarf was made for display at Yarnhouse in the NoDa district of Charlotte, NC.  I used Louisa Harding "La Salute", and Universal Yarn "Curly Mohair" to make that one.  When I finished, it was SO HARD to let it go.  I immediately made plans to make one for myself.

If you follow my blog, you've seen the other two I've made, but I'll show them here again for newcomers.

Wearing the French Scarf

That one was knit with ONline Linie "43 Punta", Plassard "Flore", and an unnamed Ormo yarn.  Orange is one of my favorite colors, and I really love wearing this beautiful scarf.  I get so many compliments!

Midnight Dream Complete

My third French Scarf was knit with Lion Brand "Moonlight Mohair" and Moda Dea "Dream".  I gave that one to my sister, when I visited her in California.  I have enough yarn left to make another for myself. ;)

It's been about 6 months since I made that last one, and now my fingers are itching to create another one.  I think that half the fun of the project is selecting yarns to make it!  Since I have such a HUGE stash of yarn in my craft room, I have LOTS of options for my next French Scarf.  In fact, I have so many options, that I'm not sure which one to choose.

I need to use light, frothy yarns for the scarf, so it doesn't get weighted down.  One should be a standard fluffy mohair type, and the other can be a fluffier curly mohair type.

When I first started planning my project, I sat in my craft room rocking chair, and perused my stash photos on Ravelry with my little Samsung Galaxy Tab.  (It sure is easier than looking through all my bins of yarn!)  I am SO GLAD that I have posted every single skein of yarn I have.  It just makes project planning so easy. :)

After awhile, I was getting confused, trying to remember all the yarn options I had.  So, I hefted my weight out of that rocking chair, put down my Tab, and went to my main computer in the living room.  The big screen on that computer, in addition to the old fashioned keyboard, just makes it easier to browse.  Plus, I can open several windows at once with my PC.

With a cup of hot tea at my right hand, and a small plate of cookies at my left, I got to work.  I opened up my Paint program, and then pulled up my Ravelry account.  I started out by sorting my stash by fiber, but then realized that I couldn't really see all my fluffy yarn options this way.  So, I just sorted it alphabetically, and scrolled down a screen at a time.  Whenever I saw a yarn that would work well for a French Scarf, I clicked my "prt scr" (print screen) button - then went to my Paint program to paste the image there.  In Paint, I would select the photos of the yarns I liked, and moved each image to the top of the screen.  Eventually, I had a very large document, with LOTS of yarn photos.

Next, I divided that Paint document up into several documents, sorted by color.  Then, I uploaded those photos to my Flickr account.  That way, I would have my documents online, so I could view them with my Tab anywhere I went. :)

So, after all those hours of work, here are my yarn choices for a French Scarf:

White Options
French Scarf - Whites

Black
French Scarf Black

Brown
French Scarf Brown

Red and Orange
French Scarf Orange Red

Yellow and Beige
French Scarf Yellow Beige

Green and Grey
French Scarf Green Grey

Teal
French Scarf Teal

Blue
French Scarf Blue

Purple and Pink
French Scarf Purplish Pink

Like I said, LOTS of choices.

I wonder if I will ever actually start another French Scarf?  HA!!
I just have too many options to choose from.

Which combinations do YOU think would work well for a French Scarf?


Blog Archive

About Me

My photo
I'm a forum moderator and blogger for Spinrite Yarns (www.yarnspirations.com), and I spend WAY too much time there. :D You can also find me on the Knitting Help Forum occasionally